

Magic Loop Knitting: How Does It Work?
The Magic Loop Method is a knitting technique that allows you to knit small projects or projects with few stitches on a long Circular Knitting Needle. It uses a long cable and a flexible loop to create a small workspace, making it easy to knit with just one Circular Knitting Needle.
When do you use the Magic Loop method?
The Magic Loop Method is especially useful for projects such as socks, gloves, sleeves, baby clothes, or other projects with a limited number of stitches. It allows you to knit in the round without needing extra needles. It saves time, reduces the risk of laddering, and makes it easier to maintain the correct tension.
How do you knit a Magic Loop?
Here is a step-by-step guide on how to use the Magic Loop method when knitting on a Circular Knitting Needle:
Step 1: Tools & Supplies
Make sure you have the right materials on hand. You'll need a Circular Knitting Needle with a long, flexible cable and yarn that matches the needle size.
Step 2: Stitches
Start by casting on the required number of stitches onto the Circular Knitting Needle, as indicated in your pattern. Make sure the stitches are evenly spaced along the cable.
Step 3: Creating the Loop
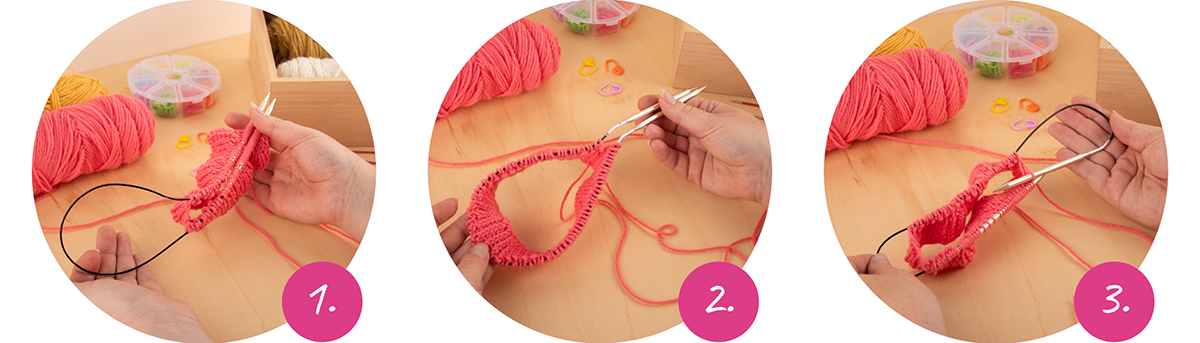
Slide the stitches toward the center of the cable so that you’re roughly in the middle of your work. Next, grasp the cable with your free hand and fold it into a loop. The loop should face toward you and be large enough to allow you to knit comfortably without pulling the stitches too tight.
Step 4: Distribute the stitches
Divide the stitches into two equal parts. One half of the stitches is on the cable in front of the loop, while the other half is on the cable behind the loop.
Step 5: Knit
Start knitting from the first stitch on the right side of your work. Knit the stitches as you normally would, holding the Knitting Needle in your right hand and the free needle in your left hand.
Step 6: The Transition
Once you have knitted all the stitches on the right side of your work, you will reach the loop. Gently pull on the cable on the right side of your work to tighten the loop. This creates enough space to move the needle to the wrong side of your work.
Step 7: Turn the workpiece
Turn your work over so that the back side is facing up. Slide the stitches to the end of the cable where the free needle is located. At this point, you have finished the front side of your work and are ready to start knitting the back side.
Step 8: Knit from the back
Knit the stitches from the back of your work in the same way you knitted the front. Hold the Knitting Needle in your right hand and the free needle in your left hand.
Step 9: Repeat
Repeat steps 6 through 8 until you have knitted all the necessary rows or rounds.
Step 10: Finishing Touches
Follow the pattern to finish the knitting and bind off the stitches when you're done.
What should you keep in mind when knitting using the Magic Loop method?
- Choose the right Circular Knitting Needle: Use a Circular Knitting Needle with a long, flexible cable—preferably longer than 80 cm—so you have enough room to form the loop.
- Distribute the stitches: Make sure to distribute the stitches evenly along the cable so that you can create a symmetrical loop.
- Don't pull the loop too tight: Make sure the loop is large enough so that you can knit the stitches easily without pulling them too tight.
- Pay attention to the transition between needles: Make sure to place the transition between needles in an inconspicuous spot, such as the center of the back of your work.
- Check the tension: Since you're working with a longer cable, it's important to check the tension regularly to avoid knitting too loosely or too tightly.
Conclusion:
The Magic Loop Method is a handy technique that makes knitting on a Circular Knitting Needle even more versatile. It allows you to knit small projects or projects with few stitches easily and efficiently, without needing an extra pair of double-pointed needles. By choosing the right Circular Knitting Needle, distributing the stitches properly, and paying attention to the loop and tension, you can enjoy this handy technique with ease. Try the Magic Loop Method and discover how it simplifies and speeds up your knitting projects!
We hope we've helped you get started with the Magic Loop Method. Happy knitting!
Sign up for the Newsletter and stay informed
Never miss another blog post? Sign up for our Newsletter and stay up to date!
Share your creations on social media using #Yarnplaza
Share your creations on social media like Instagram and Facebook using #Yarnplaza, and who knows—your creation might just be featured on our "Wool of Fame"!


